|
Creating
A new virtual server is created by pressing the New Virtual
Server button on the Virtual Servers tab. The first
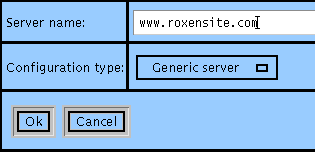
thing you will have to do is choose a name for your virtual server.
The name will be used to identify it in the configuration interface.

Creating a new virtual server
Configuration types
The next thing to choose is what kind of server you want to create.
The configuration type determines which modules will be pre-installed
in your new virtual server. There are a number of configuration
options to choose from.
- Bare bones
-
This configuration creates a virtual
server without any modules pre-installed. With this configuration type
you get total control of your new server.
- Basic server
-
This configuration contains a few basic
modules you need to get going.
- FTP server
-
This configuration provides you with the
modules you need to run a FTP server. The configuration also provides
a pre-configured FTP port.
- Proxy server
-
This configuration provides you with all
of the proxy server modules you need to run Challenger as a proxy
server.
- Generic server
-
This configuration contains the most
common and popular modules used with Challenger. It is the default
configuration.
- Manual viewing server
-
Configuration for viewing the on-line manuals, compelete with all
modules necessary for running the interactive examples.
Configure Server Variables
Your virtual server will now be installed containing a number of
modules. Some of these modules may require further configuration,
please refer to the chapter about that specific module.
One thing that you will have to configure is how your virtual
server is to be accessed by the outside world. If it is to be accessed
through IP-less HTTP, you only need to fill in the Server Variables/Server URL
variable. Please refer to the HTTP page for more
information about IP-less HTTP.
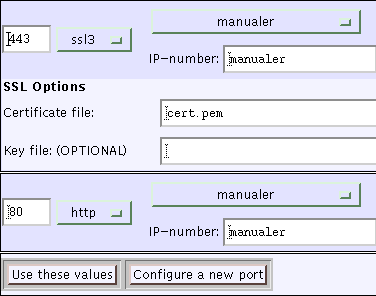
To use any other protocol you need to configure a port for it. This
is done through the Server Variables/Listen ports variable. There you press
the Configure a new port button.
- Port
-
Enter the port number you want your virtual server
to bind to. The default port depends on the protocol used, 80 for
HTTP, 443 for HTTPS or 21 for FTP.
- Protocol
-
Please select which protocol you want your
virtual server to respond to. You can choose between the following
protocols: FTP, HTTP, HTTPS or tetris, default is HTTP.
 If you want to you can bind your virtual server to several ports and
protocols. For example, you may want to configure a virtual server to
handle both an HTTP and an HTTPS port. Or you might want to have both
an HTTP and a FTP port, so users can upload pages through FTP.
- Host
-
Please select or enter which interface the port
should bind to. The interface is identified either by its host name or
IP address. The default is ANY, which means that the port will be
bound to every interface and answer to every IP address the computer
handles.

Configuring listen ports
Once you have made your choices press the Use these
values button. When you later press the save button
you will be prompted to enter the right Server Variables/Server URL variable
as a sanity check.
 The port might not always be opened properly. You can always find out
if it has been opened by zooming in on your virtual server on the
Virtual Servers tab. In case the port was not opened
properly a restart of the server might fix the problem. If not it is
probable that the server does not have the privilege to open the port,
or some other process has already opened it. It is common that the
default FTP port, 21, is already in use by the Unix FTP daemon and
that the FTP daemon must be disabled in the /etc/inetd.conf
file.
|


