|
|
|
|||||||||||||||||||||||||||||||||||||||||||||||
|
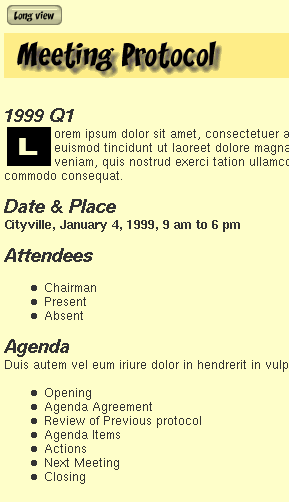
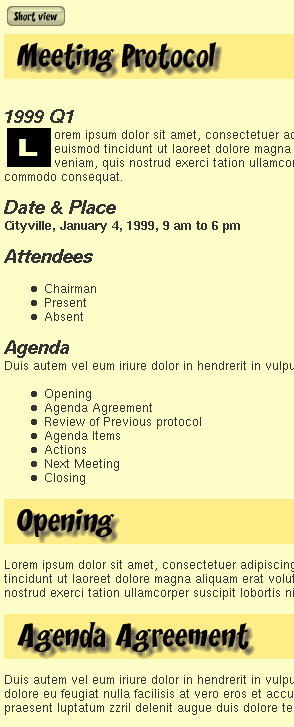
A basic example of <if>This section will show a simple example of how we use <if> in a web page. After reading this section you will understand how to use <if> with the Match plugin. We will create a feature on the DemoLabs Inc. site (shipped with Roxen WebServer). This feature includes the possiblity to toggle between short view and long view using a button while reading a protocol in the Management Protocol Archive. The short view only displays the header of the protocol, while long view shows the full protocol. Short/Long feature in protocolsImagine that the protocols tend to be rather long and that someone only wants to check which persons were present and what issuses that were discussed during a meeting. Wouldn't it be nice only to view a 'header' of the protocol per default, containing these data. The whole protocol should only be displayed when the user explicitly requests that. To accomplish this we add some RXML and a button. The button will be used to toggle between viewing the whole protocol and only the 'header'. Since we want every new protocol file to have this feature we will edit the Stationary Protocol file protocol.html. This is a default protocol file that is used as a foundation for creating new protocol files. At the top of this file we add the following code:
Before the line <h1>Opening</h1>, which is the starting header for the full view mode we add an <if> test. Only if the user requests long view the content between <if> and </if> will be sent to the browser. Finally we add </if> at the last line of the file.
This will result in the following button and short form of the protocol file when loaded the first time:
The trick is to dynamically insert the right form depending on which view is requested. This is accomplished with an if-elseif-else statement. <if> checks for an empty &form.request;. This will only be the case the first time the page is loaded. <elseif> catches the case when long view is requested and <else> the case when short view is requested.
The inserted form contains a hidden field with its request variable set to the mode that will be requested on submit and a special XSLT defined button - <submit-gnutton> - with its displayed text set inside the container. XSLT is not in the scope of this Lesson, so we will leave that with telling this is used only to get a nice look-&-feel.
You could use an ordinary submit button as well:
Well, there it is! Finally, let's have a look at a part of the long view version of a protocol page:
SummaryThis section has shown a basic example of how to use the <if> plugin Match. More details about <if> and If Plugins are found in the Web Site Creator Manual and/or by adding <help for='if' /> in a web page. The next section, Combining <if> and <define> will teach the basics of how to use <if> and <define> to dynamically display contents in a web page. |
|||||||||||||||||||||||||||
|
|