 |


|
|
Admin Tab
Below the Admin tab you have access to the Update server,
your personal settings for the look and feel of the administration
interface, and the user database for the administration interface,
where you set up what users have what administrator rights.
Update
The Update subtab holds the interface for the Update client
you may have chosen to activate during the installation phase. This is
where you download and install the material that may or may not have
been made available to you via the Update server - to date mostly
security fixes.
Your Settings
Under this subtab, you may configure the admin interface to your
personal preferences. Any and all settings made here affect only the
user you are currently logged-in as, "administrator" if you didn't
change the name suggested in the installation phase. This list
intentionally does not cover all options, but focuses on a selection
of the more interesting ones.
- Content Boxes
-
The content boxes let you put various info or news on the start
page at the root of the admin interface; alerts of new articles at
Roxen Community, info on
recently posted tickets to the Roxen Internet Software bugtracking
system BugCrunch, server status or other things. Try them out!
- Theme
-
The single most visible configurable option of the admin interface
is the theme selection, where you choose whether you want the most
recent brand of layout from the Roxen marketing department, the lovely
colorful touch of the Power Puff Girls, or something plain different.
If you administer several Roxen servers and want to differentiate them
from one another, set up your administrator user to different themes
for different servers.
With a little tweaking of your own with the colours and other bits
and pieces in the shipped themes, you can fairly easily create one of
your own. Have a look at the README file in the
roxen/server-version/config_interface/themes directory
of your installation (where version is the version of your
server, e g 2.2.198), copy one of the present theme directories and
put it in roxen/local/config_interface/themes/ instead, under
a new name, and you're off! Putting it in the local/
hierarchy instead of the server-* tree makes sure your theme
is still there when you upgrade to a newer Roxen version. Make sure
you change the contents of the name file too to whatever you
want to show up in the Theme selector.
- Font Sizes
-
You may freely modify the font sizes used in the docs and for the
various form elements of the administration interface with this
setting. This setting only affects the contents used in the admin
interface sent as text; buttons and other images rendered with Roxen's
graphics engine remain their original sizes.
|
Note!
|
If you are using an old Netscape browser and consider mostly
all fonts to be way too big, it may be an even wiser choice to tell it
not to render fonts that big for unicode characters; see Page
charset below.
|
- Compact site list
-
If your server hosts hundreds or perhaps thousands of sites, the
overview of all sites below the Sites tab tends to grow into
a frightfully long and rather intimidating piece. The compact mode
version replaces the site name buttons with a single select box for
choosing your site.
- Page charset
-
Being an internationlized product, Roxen supports sending its pages
in foreign character encodings of various kinds - for americans or
western europeans, ISO-8859-1 may be quite enough all or close to all
of the time, but for encoding japanese, chinese, vietnamese or korean
characters (to name but some) this is not enough, and thus the
administration interface by default sends all its pages encoded in UTF
8, a common Unicode encoding. You may choose to use another encoding
that suits you better here, and the characters that can not be
expressed within that will be coded as HTML entities instead.
|
Note!
|
Some Netscape users may find that all fonts in the
administration interface tend to get overly large when the utf-8
setting is used. This is most likely because the font settings under
Edit -> Preferences -> Fonts has different settings for
different encodings, and the default settings for the encoding Unicode
is larger than the rest. Try modifying to your taste, if this is the
case.
|
- Interface language
-
If you would prefer Roxen administration in some other language
than American English (or something close to it at least), this is
where you can flip the switch to something you prefer over it.
You might notice that many things will still show up in English
even after changing languages. If you want to help translating the
interface to your language, we will happily receive your contributions
and commit your work to future versions of Roxen. See the
README file in your
roxen/server-version/translations/ directory (where
version is the version of your server, e g 2.2.198) for more
details.
- Font
-
Changing the administraton interface font will not automatically
switch fonts for all text of the admin interface, however all
the admin interface's buttons and images rendered using Roxen's
graphics support will be.
|
Note!
|
If you choose a font that lacks characters that are used by
the translation to the interface language of your choosing or that you
are using in site names for that matter, you may notice empty buttons
and icons popping up all over the place. To fix this, either revert to
the "roxen builtin" font, or another Unicode font.
|
- Add/Delete module page type
-
With this setting, you may change the layout of the dialogue used
for adding modules to a site; everything from the normal categorized,
two-level folded list with descriptions to a very simplistic view
where you can add lots of modules in one go. Try out the different
options to find out what you like best.
Users
The final tab contains the accounts for all users who have access
to the administration interface, as well as their security clearance -
what actions they may and may not perform in the admin interface of
your server. Using the first two buttons, you create or delete users
(both prompt you for a user name). A new user has no admin rights at
all, so you will have to add them to your liking too. After changing
the settings below to your liking, be sure to finalize them by
clicking a Save button. The data fields for each user
(identified by their login name heading) and their purpose:
- Real name
-
The Real name you provide in the first field will be shown
at the top right when the user is logged in, and also shows up in the
debug log when he or she logs in, for instance "15:39:48 :
Buttercup Utonium logged on as buttercup from buttercup.roxen.com
(194.52.182.224).".
- Password / Again
-
To change to a new password, write it in these fields. You have to
write it twice, to be sure you spell it exactly the way you intended.
Case matters. You will be prompted to rewrite the password if the two
did not match.
- Crypted
-
If you have a password crypted with the standard unix
crypt() method, (for instance as fetched from a non-md5
/etc/passwd or /etc/shadow file) you want to set for
the user, paste it in here instead of a plain-text password. This way,
you as an administrator need not know what password the user really
use - which is a good security practice.
Apart from the text fields, there is also an assortment of buttons.
The Save button saves all changes made to the users in the
list. Actually, all of the buttons in the matrix to the right are
implicit save buttons too, so a change of user rights does not have to
be confirmed with another click on Save. The more prominent
buttons on the right determine how much fun the user can have, or how
much damage she can do, depending on your point of view.
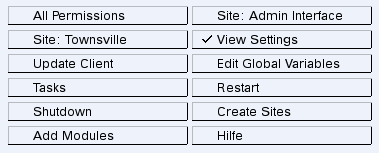
The matrix of administration interface user permissions
- All Permissions
-
Assuming the user is supposed to have all permissions available,
use this shorthand instead of manually checking all of the others.
- View Settings
-
To be allowed to access anything at all in the admin interface,
apart from user settings, the Home and Docs tabs, a user needs View
Settings rights.
- Update Client
-
This flag grants the user rights to use the Update Client.
- Site: [your site name here]
-
If you check one of the Site buttons, the user will have
the rights to administer that site's configuration.
- Hilfe
-
Checking Hilfe permissions gives this user the right to
login to a hilfe port, thus being able to execute any pike code as the
user running roxen via a telnet session. This can be a very handy
feature for a developer, and an even greater security hole if used by
a malicious user.
|
Note!
|
If a Hilfe port is setup not to require authentication at
all, the configuration of this flag does not matter - everybody that
connect will be allowed to use the hilfe interface.
|
|
|