|
|
|
|||||||||||||||||||||||||||||||||||||||||||||||
Building a Sample DatabaseIn the previous chapters we introduced how to build and install your database server. In this chapter we'll build the sample database that will be used throughout this manual. Make sure your MySQL daemon is running and that the MySQL program files are in your PATH, then use this command line
The database server will create files making a database. A single database server can handle many databases: each is a data repository, completely independent from all the other databases hosted by the same server. A database can be dumped using the "mysqldump" utility. It will create an SQL script file, that when run will re-create the structure and contents of a database. The sample database was dumped with this utility. You'll now want to fill in the sample database. To do so, you must use the "mysql" utility, with these command lines:
The "mysql" utility is a so-called "interactive monitor", an application whose purpose is to execute arbitrary SQL statements interactively. It is a very powerful and useful tool, and it's advised to get familiar with it. The two lines are required because I chose to dump the database structure (the so-called 'schema') and the data separately. The sample database is a simplified excerpt of the CIA World Factbook. It only covers a few nations, and for each nation only a small amount of data. From this moment on, we will not use the administrative user to develop the examples. Instead, we will create a user named 'user' with password 'password' and use it. Make sure you remove that user once you are done with this tutorial. To create the user, you will need to issue this query from inside the mysql interactive monitor:
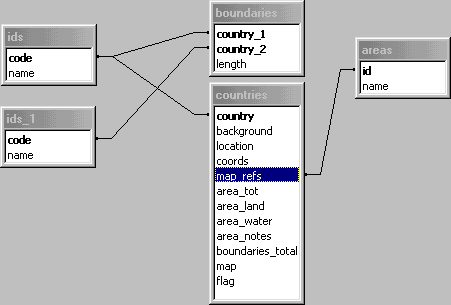
...which grants all privileges on sample.* to the user identified by 'password'. The Sample Database StructureThe sample database consists of four tables. The first one, named 'ids' is used to tie country names to their 2-letter unique codes, which are used everywhere else. The one named 'areas' has the purpose to tie a few world areas to an unique integer identifier. Although in theory both those tables could be not necessary (they handle a very simple association, the 2-letter country code could be very easily substituted with the country name in every place it appears), they actually serve two purposes: they make the other tables more compact and efficient (a 2-letter unique code is simpler to handle and requires less space than a variable-length name), and they formalize and restrict the domain of possible choices, allowing for a cleaner and more robust design. The 'countries' table contains a few descriptive fields for each country, possibly in relation with other tables. The 'boundaries' table contains informations about the countries boundaries. It could be considered relationed to the 'countries' table, but it's more practical to see it as a separate entity.
|
|||||||